Showing posts with label Format. Show all posts

Sunday, June 16, 2013

Review: Convert almost any entertainment file to another format with free Adapter

AppId is over the quota
Adapter With so many devices and so many OSs, you may be done with fun if you can't convert an entertainment file format. Adapter converts audio, image video, and even game files to keep the good times rolling.

Download Now

Just think for a moment how many devices and operating systems you use in a day. Now you may jump from a Windows PC to a Mac (or vice versa). Or use an iPhone or Blackberry?  Or maybe you use an Android or Kindle Fire? The fact is that with so many systems, being able to do quick efficient no-fuss file conversions to suit the platform you are on has become an absolute-must. This is why Adapter should be on your shortlist of apps to install on your system.

Adapter is made by the same company that brought out the awesome iExplorer, and it comes in PC and Mac editions. The interface of the PC version I tested is straightforward and intuitive, and adding files is as simple as drag-and-drop with your mouse. There are no long complicated user manuals to memorize, no complicated audio codecs to install, no screen resolutions to remember in advance. Adapter is a good example of software that allows you to just add the source file and click the button to go.
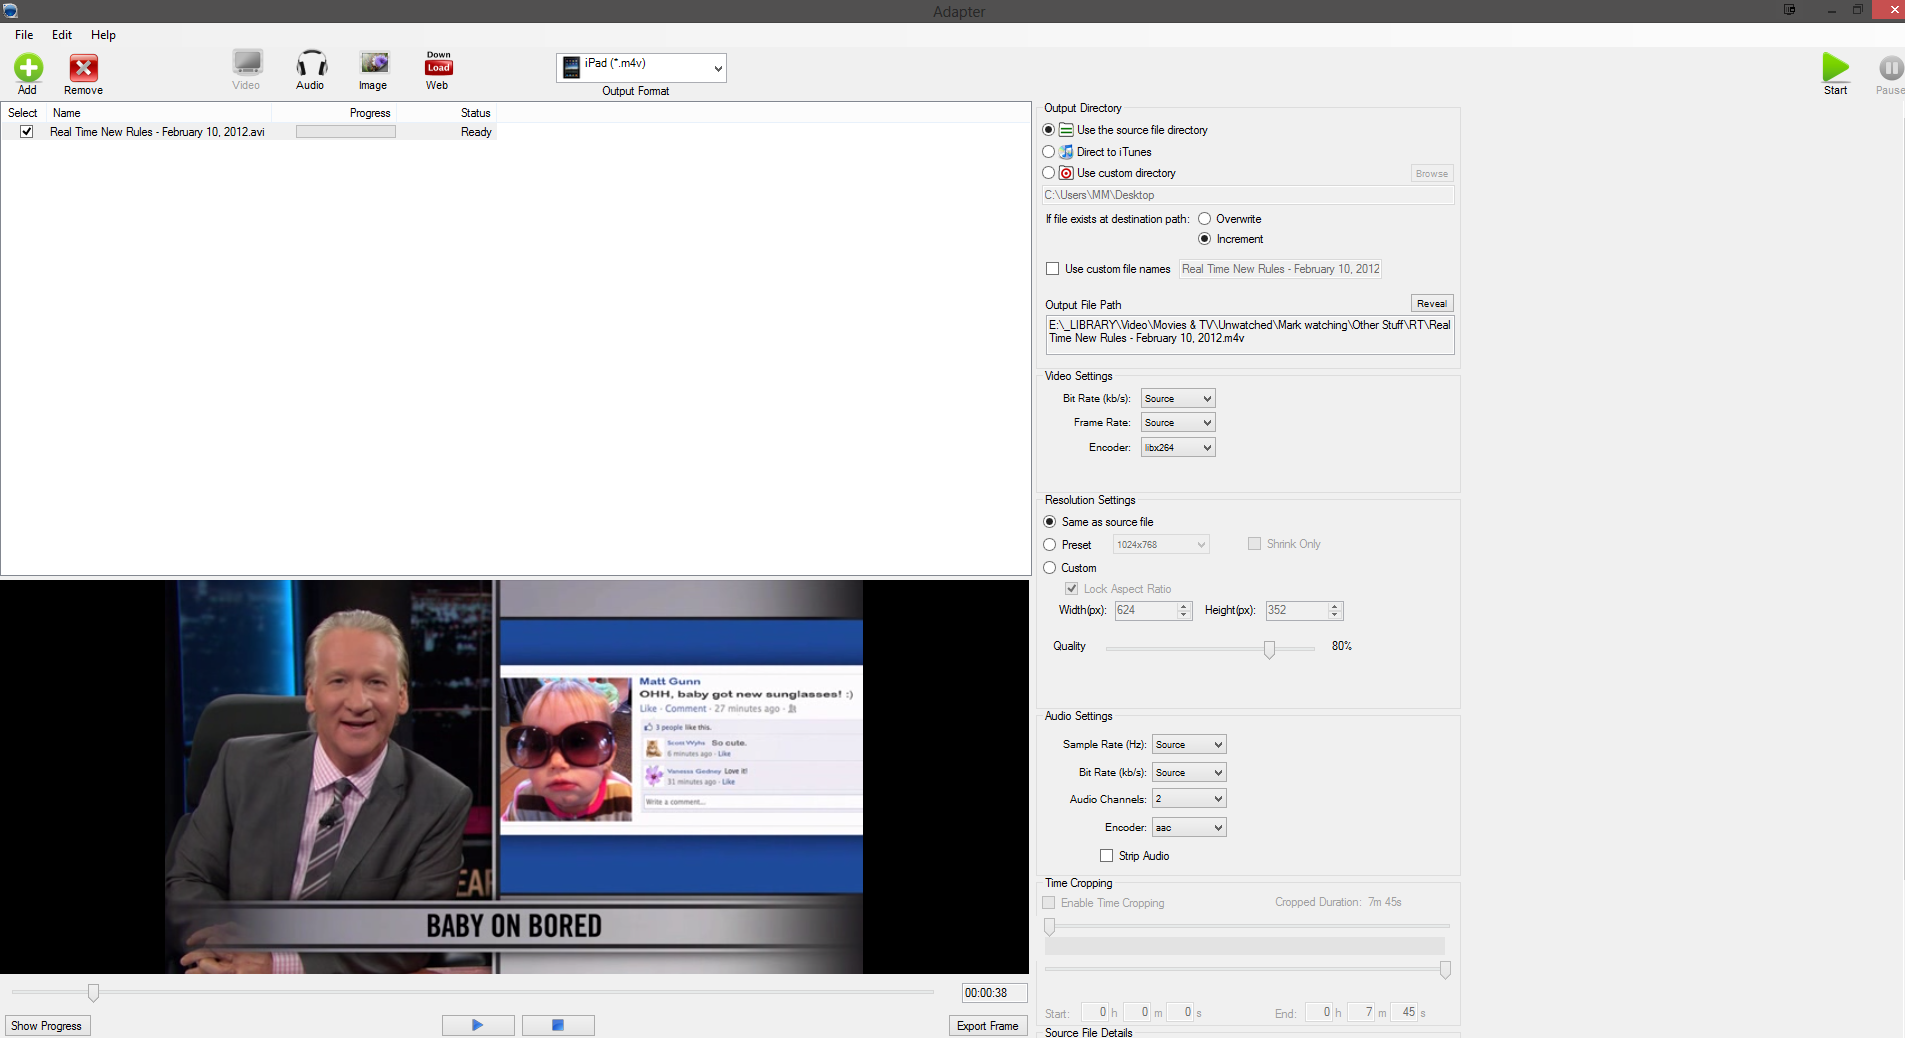
After choosing the type of file and loading the source file, a range of options present themselves to you including the output file format, destination folder and more.

The software has numerous different functions. It can handle video (including DVD files and Flash), images (including animated GIFs) and audio (including iPhone ringtones). It can even convert files for games consoles such as the Playstation, Xbox, and Nintendo Wii. To begin, just choose your format at the top (video, audio, image) then either press the "add" button or drag the file into the main area with your mouse, and drop. Then in the top toolbar, choose the file format you want to convert to, check that the other options are as you want them. You can more or less keep them as they are, with the possible exception of the output directory. I wouldn't recommend fiddling with the default settings unless you know what you are doing. Then press the "start" button and wait for the file to be converted.

On the whole, Adapter converts files really fast, unless of course you are converting a huge video file which will take slightly longer. But if you are converting say an MP3 file or a YouTube video, then it doesn't take very long at all.

Adapter also lets you edit an MP3 file and convert it into an m4r file, so you can send it to iTunes as an iPhone ringtone. When you have dragged the source audio file into Adapter, look to your right and use the sliders to choose the size of file you want converted into the ringtone. Then choose m4r as the output format and away you go again. You can even tell Adapter to send the completed file directly to iTunes on your computer.

If you are using Adapter to make an iPhone ringtone, you can use this cropping tool to get the right length of file.

The final feature Adapter offers is a lightweight browser which you can use to go to YouTube and download videos directly to your Adapter installation. From there you can download as a video or extract the audio. Even though Adapter told me that the browser was "outdated" and "no longer supported," it still worked perfectly fine.

The only real con that was readily apparent was that trying to convert MP4 files resulted in the app crashing. It seems as if Adapter doesn't like converting MP4 files at all. The developer maintains however that this should not happen, and was unable to replicate the problem.

If you were planning to use Adapter for converting MP4's, and you encounter the same problem as I did, there's an easy fix: Use SUPER instead, which converts MP4 files to AVI in a flash.

There are lots of file converters on the market, some good, many bad. Adapter definitely firmly falls into the good column and is worth using, especially considering that it is free. You can't argue with that.


View the original article here

Friday, April 12, 2013

Format and customize Excel 2013 charts quickly with the new Formatting Task pane

AppId is over the quota

The new Excel offers a rich set of charting capabilities that make creating and customizing charts simpler and more intuitive. One part of the fluid new experience is the Formatting Task pane.  

Until now, precise adjustments to chart elements were made in the Format dialog box. The box sometimes obscured a portion of the chart, changes entered in the box were not visible until you closed it, and you had to select the exact element on the chart in order to see the options that were the best fit for the job.

In the new Excel, the Format dialog box is replaced by the Formatting Task pane. The pane aligns neatly with the right or left side of the screen, so it's less likely to obscure the chart, and changes happen in real time, so you can immediately see how your choices affect the chart. The Formatting Task pane also offers an element selector so you can jump quickly between different elements without having to select one to modify.

The new Formatting Task pane is the single source for formatting--all of the different styling options are consolidated in one place. With this single task pane, you can modify not only charts, but also shapes and text in Excel.

The fastest way to open the Formatting Task pane is to double-click a chart element. You can also use the keyboard shortcut CTRL+1 while a chart element is selected. There are two other ways to open the task pane:

The first way: On a chart, select an element. On the Ribbon, select the Chart Tools Format tab, then click Format Selection.

The second way: On a chart, select an element. Right-click, then select Format where is the axis, series, legend, title, or area that was selected.

Once open, the Formatting Task pane remains available until you close it. Since it always stays on the right or left side of the screen, the pane remains unobtrusive as you concentrate on other tasks. The options in the Formatting Task pane will change based on which element is currently selected. For example, if you select a legend, the Formatting Task pane offers layout, fill, and effect options uniquely tailored to the legend element. With this more intuitive experience, you can feel free to leave the Formatting Task pane open while you format different elements of your chart.

The element selector in the Formatting Task pane allows you to jump quickly between different elements without selecting them in the chart itself. Since some chart elements are small and perhaps difficult to select, the element selector is a great alternative to the "hunt and peck" approach.

The element selector is in the top left of the Formatting Task pane. The selected element is displayed, along with a down arrow. Clicking the down arrow opens a dropdown menu that shows all elements of the selected chart. When you choose an element from this menu, the Formatting Task pane displays options uniquely tailored to this element, and it also selects this element in the chart.

You can also find the element selector on the Ribbon on the Chart Tools Format tab.

Chart options in the Formatting Task pane are in two categories: Size & Properties and element-specific.

Size & Properties deals with sizing, alignment, and miscellaneous properties such as alt text and locks.

The Chart Area element is unique in that its Size & Properties options affect the chart as a whole. Size, scale, and aspect ratio can be adjusted only on the Chart Area element, from which all other chart elements derive their inherent size and scale. The Chart Area element also controls the alt text of the chart, whether the chart moves and/or sizes with its underlying cells, and whether the chart is printable and locked.

Other chart elements can adjust their alignment from the Size & Properties options, which dictate vertical alignment, text direction and angle, and margins.

There are unique, element-specific options for axis, legends, and series:

Axis Options. Axis options allows you to adjust the axis bounds and units, the placement and interval of its labels, and other options including tick marks and number format.

Legend Options. Legend options allows you to specify the position of the legend, and whether or not it overlaps the chart.

Series Options. Series options allows you to specify whether the series should be plotted on the primary or secondary axis, the spacing and width of the columns on a bar or column chart, and the angle and explosion (separation) of the slices of a pie chart.

In addition to chart options, the Formatting Task pane allows you to fine-tune the visuals of each chart element by offering a multitude of line, fill, and effect styles. These styling options are available for shapes as well.

Line options allow you to adjust the styling of the lines and borders of each chart element. There are two line types: solid and gradient. A solid line uses one color throughout, while a gradient line changes smoothly from one color to another along its path. Regardless of the line type you choose, you can adjust a line's thickness, transparency, dash type, and endpoint settings.

Fill options allow you to choose how the inner portion of each chart element is filled. There are four fill types: solid, gradient, pattern, and picture. A solid fill uses only one color, while a gradient fill smoothly blends multiple colors along its filled region. A pattern fill tiles the inner fill region with preset imprints such as crosshatches and tiles, and a picture fill uses preset textures or a picture that you specify.

Please note that certain chart elements, such as the series of a Line Chart, do not have an inner fill region to color or tile. Fill options are disabled for these chart elements.

Effect options offer a powerful set of effects that add visual impact to your charts. Effects include shadows, glows, soft edges, and 3-D formatting.

Shadow. This effect adds a shadow either outside or inside the chart element.

3-D Formatting. This effect adds a bevel to the chart element to give it a 3-dimensional relief.

In addition to modifying the look and feel of charts and shapes, you can also style text inside these objects.

Text options are in the top right of the Formatting Task pane. Clicking Text Options toggles the task pane into text styling mode. You can toggle back to the former chart and shape styling mode at any time by clicking the element selector's title.

In text styling mode, you can modify the look and feel of your text using the same line, fill, and effect options that are available for charts and shapes.

The new Formatting Task pane is just one of many ways to customize and refine the look and feel of your charts. The on-object buttons featuring the new Chart Elements and Chart Styles provide quick access to the most common chart customizations, but when you need detail-level control, now you can get it with the Formatting Task pane. Please try it out, and give us your thoughts and feedback on the experience--we'd love to hear what you think!


View the original article here

Monday, December 31, 2012

VSDX: the new Visio file format

Translate Request has too much data
Parameter name: request
Translate Request has too much data
Parameter name: request

Drawing, Stencil and Template file formatsVisio 2003, 2007 and 2010 all had the same primary Visio Drawing (VSD) file format. For most users, this was great: files could be shared easily between these three versions of Visio.

There were, however, some drawbacks. Most notably, the primary format was binary, which limited both the information stored in the file and how easily IT professionals and developers could work with it. For example, it was difficult for third parties to access and extract data from the binary format for use outside of Visio.

For the new Visio, we introduced an XML-based file format to provide new capabilities in Visio and improve interoperability with other applications. 

The new file format allows us to provide a number of new features, such as co-authoring and the ability to view your diagrams natively in the browser using Visio Services in the new Microsoft SharePoint and Microsoft SharePoint Online in Microsoft Office 365. 

It also gives us a chance to create a single unified file format that replaces the secondary file formats that Visio has created over the years. In Visio 2010, we introduced two formats: the Visio Web Drawing (VDW) and Visio Workflow Interchange (VWI) formats. In addition, we also supported a Visio XML Drawing format (VDX) so developers could modify the contents of a file outside Visio. The new format encompasses the benefits and capabilities provided by all three of these formats.

In addition, the new format gives us the ability to address many of the requests being made by our IT professional and developer community.

File size: The new format is compressed and can produce substantially smaller file sizes--up to 75 percent smaller than comparable binary documents. This reduces the disk space required to store files and the bandwidth required to transport files through e-mail, over networks, and across the Web.Security: XML-based formats are more secure and transparent, because they store data in a standard structure that makes it easier for applications to detect security issues. We also use a separate file extension for files with executable macro code, so you can be sure that macro-free files do not contain harmful code.Data recovery: The new format improves data recovery by segmenting and separately storing different components within the file. Although rare, network or storage failures can cause document corruption and the new file format makes it easier to recover your data in these cases.

Interoperability: It is now much easier to work with the default file format outside of Visio: you can now enable any application that supports XML to access, extract, and repurpose the data using familiar development tools.

Visio has three principal types of files: drawings, templates, and stencils. These file types are still available in the new format, with one difference: like the other Office applications, we now offer macro-free and macro-enabled formats. The new extensions for each file type are listed in the table below.

For people who have used previous versions of Visio, we know that you have existing diagrams that you’ll want to be able to use in the new Visio. You may also want to share your new Visio files with others who are still using previous versions of Visio. There are several options for ensuring file compatibility.

When you open one of your existing Visio 2003-2010 drawings in the new Visio, your file will be in Compatibility Mode (indicated by “[Compatibility Mode]” following the file name at the top of the application window). Compatibility Mode means that some new commands and capabilities, such as new themes, variants, and styles, as well as co-authoring, will be disabled.

Compatibility mode

When you are in Compatibility Mode, you can make changes to your VSD drawings freely without having to worry about adding features or functionality that will not be supported when the file is opened in a previous version of Visio. Features only supported in the new Visio are disabled until you convert to the new file format.

To convert your Visio 2003-2010 drawing to the new file format, simply go to the File menu and, on the Info tab, click the Convert button. Once your file is in the new format, you will be able to work with all the new Visio features, including new themes, variants, and styles and co-authoring.

You can also save new drawings back to the Visio 2003-2010 drawing format. When you save your file in the VSD file format, the new Visio presents a list of features that will be down-converted. This gives you the option to continue with the save or cancel (if you don’t want to lose those features). Once your file is saved to the earlier format, your view of the file in the new Visio will be the same as what users will see in previous versions of Visio.

Office 2007 introduced new XML-based file formats for Microsoft Office Excel 2007, Office Word 2007, and Office PowerPoint 2007. Their file formats were the combination of a ZIP archive package and mainly XML content. Given the success of these formats, we decided to move in the same direction.

Microsoft Office file formats

You can think of the new VSDX format as being composed of two concepts: a ZIP archive package and XML content. First, we used the same ZIP archive package as used in Excel, Word, and PowerPoint. Formally, this package is defined by the Open Packaging Conventions (ISO/IEC 29500-2:2008) standard. Second, we based the XML content on our existing Visio XML Drawing (VDX) format.

Visio file format

For those familiar with the VDX format, we did make some changes and these are explained here. Also, note that some components like images, macros, and specific embedded objects are still stored as binary.

Since the new file format package is a ZIP archive, you can change the file extension to ZIP and peek inside. You will find many smaller components, or parts, that define different pieces of the file. For example, each page has its own part, and each master shape has its own part. This makes it easier to modify separate components of the file outside of Visio and also reduces the risk that a corrupt component will corrupt the entire file.

The following diagram (built with the new Organization Chart shapes) shows how a very basic diagram with one page and one master is stored hierarchically in the ZIP archive.

Structure of a Visio file

More details about the file format structure can be found in our Introduction to the Visio 2013 file format (.vsdx) article for developers.

Visio has a number of MVPs who share their passion, technical expertise, and real-world knowledge of Visio with others. They are already talking and sharing their knowledge about the new file format:

We’re working hard to put together reference material for developers who want to work with the new Visio file format outside of Visio. Here are two references already posted:

The new file format is beneficial to both everyday users and developers. Not only does it support a range of new Visio features, but it decreases file sizes, reduces security concerns, makes data recovery easier and provides great interoperability with other applications. We've already heard from developers that they are excited about the new file format, since it enables a wide range of new Visio integration scenarios.

Whether you are transitioning well to the new file format or running into issues, we would love to hear your stories. Feel free to leave comments, discuss the new Visio on our forums (Visio Answers forum and Visio MSDN forum) or send us feedback using Send a Smile or Send a Frown.

Thanks for reading!


View the original article here

Friday, April 27, 2012

Differences Between PDF and JPG/PNG Image Format for DPS

Differences Between PDF and JPG/PNG Image Format for DPS « InDesign Docs function clearSearch() {document.search_form.s.value = "";} .recentcomments a{display:inline !important;padding:0 !important;margin:0 !important;}adobe.com      InDesign Docs / Differences Between PDF and JPG/PNG Image Format for DPSby Bob Bringhurst  

View the original article here

Thursday, April 26, 2012

Part 4 Reasons to upgrade from FM 7.x to FM 10: Catalogs and Format Overrides

Friday, April 6 2012 @ 4:01 AM, By Maxwell Hoffmann

Speaking from my over one thousand hours of experience “optimizing” unstructured FrameMaker files for translation and localization, I can vouch for the following fact: FrameMaker 10’s ability to handle catalog styles more efficiently than FrameMaker 7.x and its ability search and locate format overrides can reduce some production preparation tasks by as much as 90%!  This is particularly true if unstructured FrameMaker files involved are (a) ready to be translated into another language or (b) ready to be converted to XML, DITA or some other form of structured editing.

Document content needs to have as few inconsistencies as possible to achieve decent formatting after translation/localization. When converting unstructured FrameMaker documents, you want as few “exception” (e.g. unnecessary) paragraph or character tags as necessary before letting FrameMaker automatically construct your initial conversion table. (For more background on this process, view Tom Aldous’s excellent recorded eSeminar, “Unstructured To XML Workflow Series Part 3: Creating A FrameMaker Conversion Table – Part 2”.) Note: as with all recorded Tech Comm webinars, you will need a free Adobe account to view this eSeminar. You will be prompted to create one if you do not already have credentials. The URL link in the eSeminar title will not take you to a page that displays a description of the recording.

Very few. This is not a criticism of that stalwart release of FrameMaker, still used by so many users. Adobe has listened to its users over the past 7 to 10 years, and control over format overrides was always one of the top requests. So quite a bit of product development has taken place in recent years to give FrameMaker 10 a powerful set of built in tools to (a) manage catalogs and (b) locate and correct unwanted paragraph and character format overrides.

Basically, FrameMaker 7.x’s only indication that a paragraph style, character style or table style did not match the catalog was an asterisk appearing in front of the style name in the lower left corner of the document window. The screen capture below shows all catalogs revealed in a FrameMaker 7.2 document. Notice that there is no indication of which styles are currently in use, and which styles may be leftover, unnecessary format “artifacts.”

The screen capture below shows the same document updated to FrameMaker 10. Notice that the catalog display is more logical with the addition of a “real” tables catalog to the far left. (In the previous screen capture, the FrameMaker 7.2 “catalog” was only visible via a pull-down menu from the Table Designer menu, used for modifying or designing table styles.)

Also notice in all three catalogs (paragraph, character and table), a check mark appears in front of any styles that are currently in use within the current document. As shown later in this blog, several options may be employed to change display in the catalog. The ability to tell “at a glance” which paragraphs are unused is a real timesaver when eliminating “dead” formats from templates or unstructured FrameMaker documents before conversion to structured DITA or XML.

This particular document was an actual customer file I worked on with FrameMaker 7.2 a few years ago in a project that required conversion from unstructured to structured. The client had FrameMaker files that were originally converted from MS Word documents (bringing in some “orphan” styles during the conversion process.) The unstructured FM 7.2 documents had also been edited by “many hands” from staff who were not as coordinated as may have been desired.

The screen capture below shows that each catalog has an optoin to show (a) only used formats, (b) only usued formats, (c) to display used formats first, or (d) a feature to “Delete all unused formats.” Perhaps one of the most asked for additions is the “Customized List” option, which enables FrameMaker 10 users to display only those paragraphs they wish, and also in the order they wish to view the styles in.

Because FrameMaker 7.2 was only capable of display all styles in alphabetical order (not in order of importance,) many users resorted to putting a “z_” or “x_” in front of lesser used styles that they wished to appear at the bottom of the catalog. This of course, led to some rather illogical style names, and confusion for new staff adapting to in-house style naming conventions.

The screen capture of FrameMaker 10 below shows the effect of displaying only unused formats in the paragraph and character catalogs. (Notice that no check marks are present before any of the styles.)

In this particular document, there is a large number of unused and unnecessary character styles. The screen capture below shows the catalog options being used to first delete all unused format, and then the resulting, “trimmer” catalog of styles.

Incidentally, in FrameMaker 7.2, there is a “delete” function under catalog options, but it is performed one style at a time.

Perhaps the biggest time and money saver covered in this blog is FrameMaker 10’s ability to search for paragraph overrides and character overrides. In other words, the search will highlight any portion of character level text that does not match a character tag or paragraph tag, and will also highlight paragraphs that do not match the catalog.

In many instances, the publisher may be able to tell at a glance that a paragraph has been overridden to start a new page or column. But in all too many cases, a paragraph has been shaped to have tighter line spacing, or fractional changes in point sizes in order to get “fat” paragraphs to stay on one page.  As mentioned earlier, these types of overrides can wreak havoc with either language translation or with conversion of unstructured documents.

The screen capture below shows the result of searching for a Character Format Override. In this case, text has been highlighted which was changed to italic with Control-“i“ instead of a character tag.

The screen capture below shows an example of FrameMaker 10’s find Paragraph Format Override feature identifying a paragraph in which someone has clearly reduced line spacing. The paragraph can be corrected by simply reapplying the paragraph style from the catalog.

The last feature mentioned in this blog can save countless hours correcting or optimizing documents that may have “fallen into the wrong hands.” Sometimes when contractors are used on projects, staff with minimal knowledge of FrameMaker may “fake” their way through format edits, using the wrong tools (e.g. pull down format menus) instead of paragraph and character  styles.

In a later blog, we will cover how FrameMaker 10’s ability to publish files in native XML format can completely eliminate the possibility of making any format overrides that are not built into the controlling structured application.

Limited Period Special 30% Off Upgrade Offer

HOW TO BUY:

For any queries, please contact techcomm@adobe.com.

OFFER TERMS & CONDITIONS:

Adobe® FrameMaker® 7.X customers can receive a savings of 30% on the FULL version of FrameMaker 10 software purchased through Adobe Customer Service, or a participating reseller worldwide.Offer is available to TLP and CLP customers worldwide. Orders must be placed between April 2, 2012, 12 A.M. and June 15, 2012, 11:59 P.M. Pacific time. Offer void where prohibited.Current pricing is subject to change or withdrawal without notice. This offer is not valid for OEM bundles or Education customers. Local sales taxes and shipping charges may apply.

View the original article here

Thursday, April 7, 2011

Format your information Publisher tables

Information is often to consume much easier for the reader if it in a table-no, not restaurant table-tabular rows and columns. For example, check out how much easier is this list of products and prices, if to follow it in a simple table. First the list:

Rhododendron: $15 / foot; Vine Maple: $5 / foot; Maple: $10 / foot; Dogwood (white): $12 / foot; Dogwood (Pink): $15 / foot; Subalpine FIR: $18 / foot; Deodara Cedar: $20 / foot.

And now the same information in a simple table:

This table is still boring and not really easy to read, so little flair to make it more readable by you add some color, borders, and other color and weight of the font of the text.

Formatted table example 

The point in this exercise, is obviously that easily, you can do this with Publisher, make your catalogs, newsletters, flyers, easier and more appealing to read coupons, and what you need to communicate. In Publisher 2003 and 2007, you select the table or cells in the table and right mouse button, the format table dialog box get to change the fill and border lines.

In Publisher 2010 you can format still tables in this way, but we have shown nowdesign , which on the Ribbon the table toolstab, is when you create or select a table. This tab has a gallery of predefined table formats. If you hover over each gallery selection, you see a preview of what your table looks like when you choose this format.

--Bob deLaubenfels


View the original article here