Showing posts with label Convert. Show all posts

Sunday, June 16, 2013

Review: Convert almost any entertainment file to another format with free Adapter

AppId is over the quota
Adapter With so many devices and so many OSs, you may be done with fun if you can't convert an entertainment file format. Adapter converts audio, image video, and even game files to keep the good times rolling.

Download Now

Just think for a moment how many devices and operating systems you use in a day. Now you may jump from a Windows PC to a Mac (or vice versa). Or use an iPhone or Blackberry?  Or maybe you use an Android or Kindle Fire? The fact is that with so many systems, being able to do quick efficient no-fuss file conversions to suit the platform you are on has become an absolute-must. This is why Adapter should be on your shortlist of apps to install on your system.

Adapter is made by the same company that brought out the awesome iExplorer, and it comes in PC and Mac editions. The interface of the PC version I tested is straightforward and intuitive, and adding files is as simple as drag-and-drop with your mouse. There are no long complicated user manuals to memorize, no complicated audio codecs to install, no screen resolutions to remember in advance. Adapter is a good example of software that allows you to just add the source file and click the button to go.

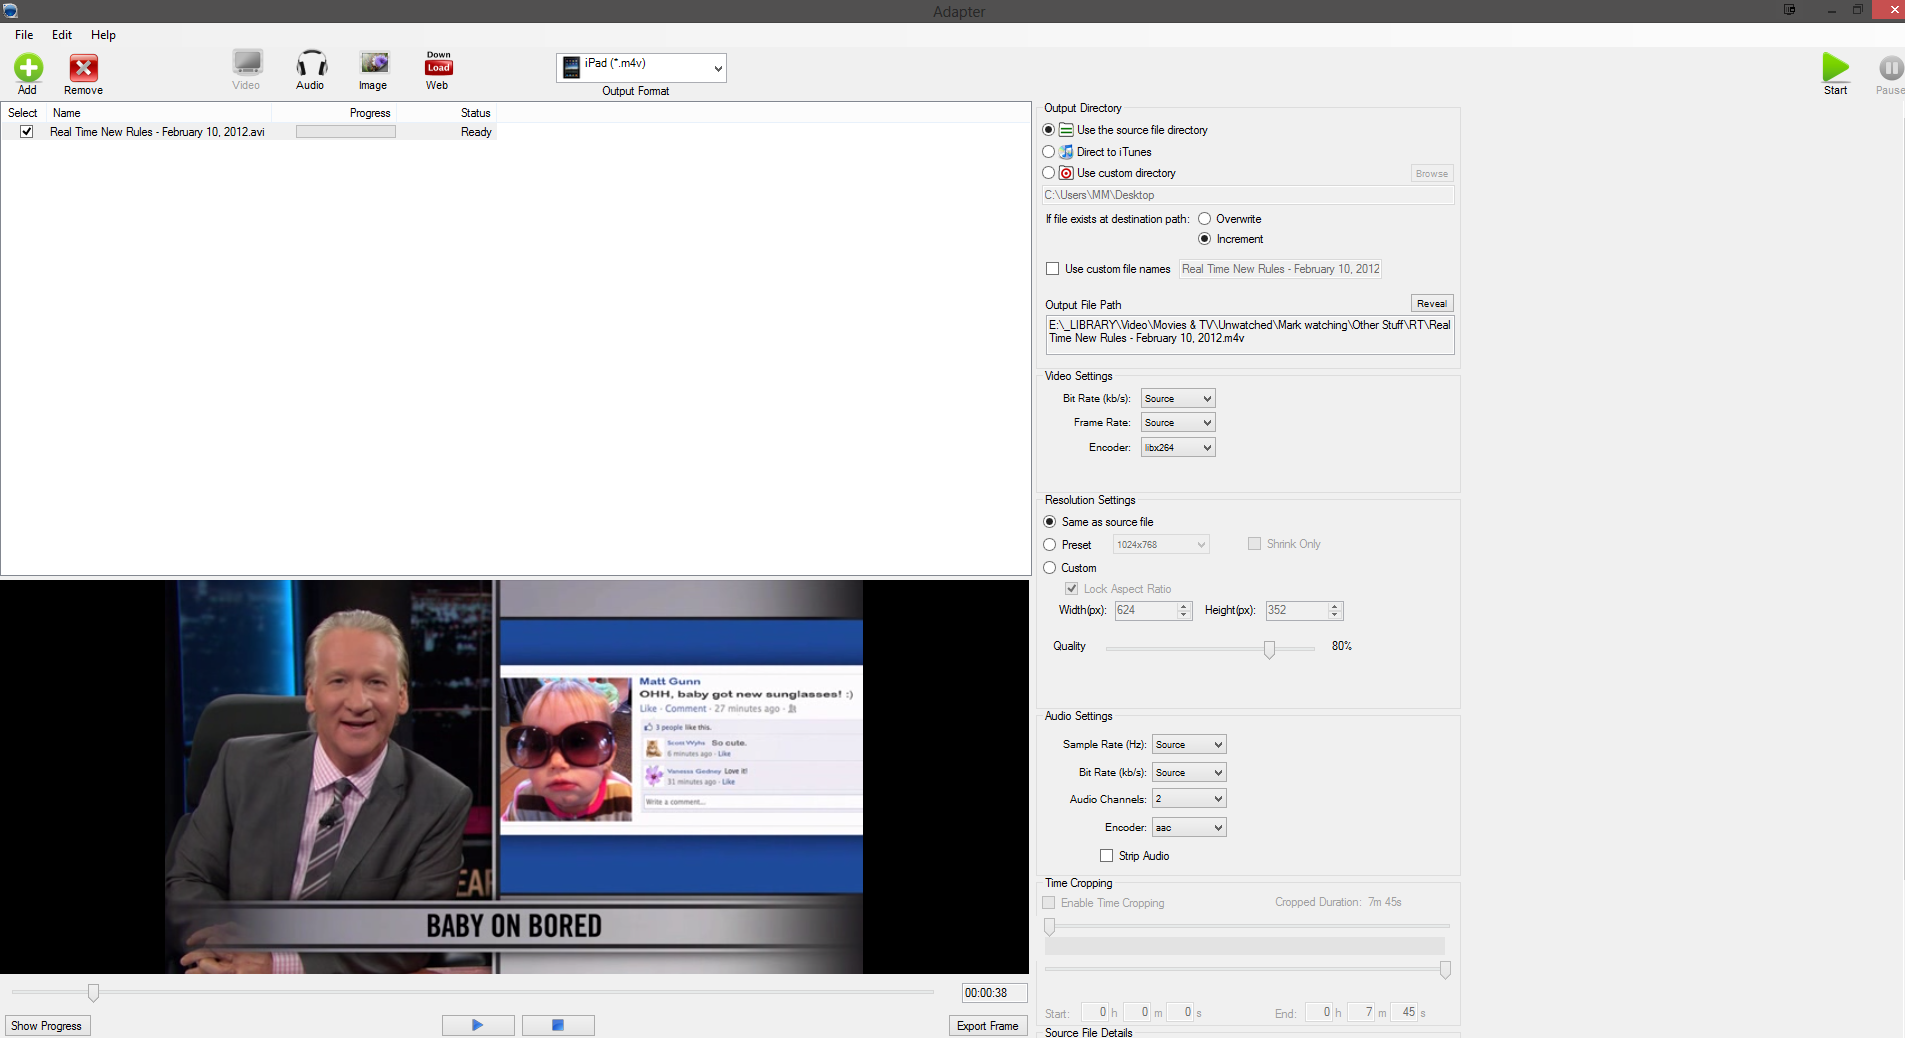
After choosing the type of file and loading the source file, a range of options present themselves to you including the output file format, destination folder and more.

The software has numerous different functions. It can handle video (including DVD files and Flash), images (including animated GIFs) and audio (including iPhone ringtones). It can even convert files for games consoles such as the Playstation, Xbox, and Nintendo Wii. To begin, just choose your format at the top (video, audio, image) then either press the "add" button or drag the file into the main area with your mouse, and drop. Then in the top toolbar, choose the file format you want to convert to, check that the other options are as you want them. You can more or less keep them as they are, with the possible exception of the output directory. I wouldn't recommend fiddling with the default settings unless you know what you are doing. Then press the "start" button and wait for the file to be converted.

On the whole, Adapter converts files really fast, unless of course you are converting a huge video file which will take slightly longer. But if you are converting say an MP3 file or a YouTube video, then it doesn't take very long at all.

Adapter also lets you edit an MP3 file and convert it into an m4r file, so you can send it to iTunes as an iPhone ringtone. When you have dragged the source audio file into Adapter, look to your right and use the sliders to choose the size of file you want converted into the ringtone. Then choose m4r as the output format and away you go again. You can even tell Adapter to send the completed file directly to iTunes on your computer.

If you are using Adapter to make an iPhone ringtone, you can use this cropping tool to get the right length of file.

The final feature Adapter offers is a lightweight browser which you can use to go to YouTube and download videos directly to your Adapter installation. From there you can download as a video or extract the audio. Even though Adapter told me that the browser was "outdated" and "no longer supported," it still worked perfectly fine.

The only real con that was readily apparent was that trying to convert MP4 files resulted in the app crashing. It seems as if Adapter doesn't like converting MP4 files at all. The developer maintains however that this should not happen, and was unable to replicate the problem.

If you were planning to use Adapter for converting MP4's, and you encounter the same problem as I did, there's an easy fix: Use SUPER instead, which converts MP4 files to AVI in a flash.

There are lots of file converters on the market, some good, many bad. Adapter definitely firmly falls into the good column and is worth using, especially considering that it is free. You can't argue with that.


View the original article here

Tuesday, April 3, 2012

Word video: Convert a table to text

AppId is over the quota AppId is over the quota a.stbar.chicklet img {border:0;height:16px;width:16px;margin-right:3px;vertical-align:middle;}a.stbar.chicklet {height:16px;line-height:16px;}Word Blog - Word video: Convert a table to text Create or Link an account or Sign in using [f] [t] [in] Please wait... Create or Link an account It only takes a few minutes to join.

You can use your favorite social network to register or link an existing account:


[f] [t] [in] [msg]

Or use your email address to register without a social network:

Username:
Choose password:
Re-enter password:
Email address:
Re-enter email address: Submit

Close Sign in

Sign in with these social networks:

[f] [t] [in] [msg]

Or enter your username and password

Username:
Password:
Forgot your password?

Sign In

Close Account linking Welcome , Do you have an existing blogs.office.com account?

Yes, please link my existing account with for quick, secure access.

Sign in name:
Password:
Link accounts

No, I would like to create a new account with my profile information.

Sign in name:
Email address:
Re-enter email address:
Register

Close Office Blogs Word Blog Home All Blogs Products Word Excel PowerPoint Outlook Access OneNote Publisher Office Web Apps Perspectives Office Casual Office in Education Office Exec Office 365 Subscribe to our RSS feed
RSS for post commentsUnfiltered HTMLUnfiltered HTML Word video: Convert a table to text by on March 28

(Note: This post was first published in September 2010.)


If you have text, you can convert that into a table. You can also convert a table back into text.


I've been seeing quite a few questions about this, so I thought it would make a good "Word of the week" video.


In this example, the table contains names and addresses. I want to convert that to comma-deliminated text so I can use it in a mail merge.


Let's take a look:


If you just want the text version of the instructions:


Click in the table. On the Table Tools Layout tab (one of the tabs that appears when you click in the table), in the Data group, click Convert to Text. In the dialog box, specify how you want the text separated.


For more information on tables, see Add or delete a table.


And for more information on mail merge data sources, see Use mail merge to create and print letters and other documents.


-- Joannie Stangeland

Tags: Office Blogs Comments

Comments: (28) Collapse

Joyce McDaniel 14,898 Posts

Wish you would give out copies to people who cannot afford it.   Would be a great gift for us.

28 Sep 2010 333 Posts

Dear Joyce,


Thank you for your comment. I know it's hard--especially in this economy. Microsoft does have a program for donating software to nonprofit organizations (www.microsoft.com/.../softwaredonation.mspx) to help them help others.


-- Joannie

29 Sep 2010 Rebecca 14,898 Posts

Since the video doesn't work on my work computer, can you just post the directions? I'm a new MS Office 2010 user and am having some difficulty keeping a positive outlook on this new system.

1 Oct 2010 333 Posts

Dear Rebecca --


Sure. Click in the table. On the Table Tools Layout tab (one of the tabs that appears when you click in the table), in the Data group, click Convert to Text. In the dialog box, specify how you want the text separated.


-- Joannie

1 Oct 2010 fahira20 14,898 Posts

hi, would u plz tell me how to convert text to a table? the video on top does not play. plz tell me step by step thanks

3 Oct 2010 333 Posts

Fahira20 --


Instructions for converting text to a table are here: office.microsoft.com/.../add-or-delete-a-table-HA010370560.aspx.


-- Joannie

4 Oct 2010 Sherry Foster 14,898 Posts

I get how to convert text to table but in 2010 can you convert table to text?  I don't see that on the menu optins anywhere.

13 Oct 2010 333 Posts

Sherry --


The video shows you how. But in case you can't see it, Click in the table. On the Table Tools Layout tab (one of the tabs that appears when you click in the table), in the Data group, click Convert to Text. In the dialog box, specify how you want the text separated.


-- Joannie

19 Oct 2010 teter.debbie@gmail.com 14,898 Posts

Where is the video - all I see is "Let's take a look" then there is nothing to follow.  It used to be simple you had a choice convert text to table or convert table to text.

21 Oct 2010 teter.debbie@gmail.com 14,898 Posts

Where is the video?  It is not in your initial post.  So I followed the last post - table tools tab only gives me  table style option,s, table styles, draw borders - where are the data options or even the  the formula options that used to be available

21 Oct 2010 333 Posts

teeter.debbie --


I'm sorry you aren't able to see the video. I'd appreciate hearing what browser you're using, because maybe it's a browser issue.


As for converting: To convert text to a table, select the text, click Table (on the Insert tab), and then click Convert Text to Table. To convert a table to text, select the table, and then click the Table Tools Layout tab (it sounds like you're on the Design tab).


Best wishes.


-- Joannie

21 Oct 2010 2 Posts

Joannie, converting table to text seems pretty straightforward. My goal is to be able to create a line of text with the first word flush left, and the second word flush right (to the right margin), all on the same line, without first using table and hopefully not using tabs. Is there a single command somewhere that would allow me to select the line and create what I think of as a justified line?

27 Oct 2010 333 Posts

Morris,


These Word 2003 instructions will work for Word 2010: office.microsoft.com/.../vary-alignment-within-a-single-line-of-text-HP005188448.aspx.


However, if you're going to do a lot of lines, I think tab stops is your better bet.


-- Joannie

27 Oct 2010 333 Posts

P.S. In fact, when you use the procedure I linked to, Word is inserting tab stops.


-- Joannie

27 Oct 2010 2 Posts

Thanks. I had not known that procedure in 2003. For a single line, it does the job.

27 Oct 2010 1 2  Next > Comments

Comments: (loading) Collapse

other Microsoft blogs Official Microsoft Blog Microsoft On The Issues The Windows Blog Bing Community Zune Insider Major Nelson other product blogs Office For Mac Office Web Apps InfoPath Project Visio other Office blogs Office IT Pro Office Updates Office Labs SharePoint Information Workers Legal | Trademarks | Privacy Statement © 2011 Microsoft Corporation. All rights reserved.

View the original article here

Monday, January 16, 2012

Leveraging AFDKO Tools to Convert Name-keyed OpenType Fonts to CID-keyed — Part 2

Part 2 of this series will demonstrate how AFDKO tools can be used to specify multiple FDArray elements (aka, hint dictionaries) when converting name-keyed fonts into CID-keyed ones. The same technique can be used to convert a CID-keyed font with a single FDArray element into one with multiple FDArray elements.

The sample font in Part 1 of this series does not have enough script “richness” to demonstrate this technique, so I crafted a different sample font for demonstration purposes. Again, the technique is easily scalable, and can thus handle thousands or tens of thousands of glyphs.

Someone kindly pointed out that I failed to do one important thing in Part 1 of this series, specifically to enumerate reasons why one would want to convert a name-keyed OpenType font into a CID-keyed one. So, before I begin Part 2 in earnest, I will provide three benefits of CID-keyed fonts:

Up to 256 FDArray elements can be specified, and each can have its own hinting parameters, meaning alignment zones (/BlueValues and /OtherBlues arrays), stem values (/StdHW and /StdVW values, and /StemSnapH and /StemSnapV arrays), and /LanguageGroup setting. Explicit control over the mapping from character codes, such as Unicode, to glyphs is possible through the use of a CMap resource. Name-keyed fonts use glyph names to drive the mapping from character codes to glyphs, which is implicit control. If the glyph set corresponds to an existing CID-keyed character collections, or is a subset thereof, that character collection’s resources can be leveraged to ease font development.

The AFDKO mergeFonts tool is used to specify multiple FDArray elements, which is done through the use of multiple mergeFonts mapping files (at a minimum, one per FDArray element) and by specifying the FDArray element name as the argument for the “mergeFonts” text that is the first line of the mergeFonts mapping file. The /LanguageGroup setting can also be specified as a second argument. Click here to download an archive that includes the various files and resources that are referenced in this article, including the original name-keyed Type 1 font (named font.pfa).

Consider the name-keyed Type 1 font, font.pfa, that includes the following 48 glyphs:

.notdef
space
A
B
C
D
E
F
a
b
c
d
e
f
uni3000
uni3001
uni3002
uni3041
uni3041v
uni3042
uni3043
uni3043v
uni3044
uni3045
uni3045v
uni3046
uni30A1
uni30A1v
uni30A2
uni30A3
uni30A3v
uni30A4
uni30A5
uni30A5v
uni30A6
uni30FB
uni4E9C
uni54C0
uni5516
uni5A03
uni611B
uni963F
uniFE10
uniFE11
uniFE12
uniFF0C
uniFF0E
uniFF0Ev

In addition to mapping these glyph names to Adobe-Japan1-6 CIDs, we will also arrange them into five FDArray elements, mainly based on glyph class.

Step 1: Create the mergeFonts Mapping Files

The character coverage of this sample font corresponds rather nicely to the Adobe-Japan1-6 character collection (see Adobe Tech Note #5078), specifically to a tiny subset of the /Supplement 0 portion. After a mapping to Adobe-Japan1-6 CIDs is established, it can be used to construct the following five mergeFonts mapping files, which effectively separate the glyphs into separate FDArray elements based on glyph class, script, or usage:

generic.map:

mergeFonts KozGoAJ10-ExtraLight-Generic 1
0 .notdef

proportional.map:

mergeFonts KozGoAJ10-ExtraLight-Proportional 0
1 space
34 A
35 B
36 C
37 D
38 E
39 F
66 a
67 b
68 c
69 d
70 e
71 f

dingbats.map:

mergeFonts KozGoAJ10-ExtraLight-Dingbats 1
633 uni3000
634 uni3001
635 uni3002
636 uniFF0C
637 uniFF0E
638 uni30FB
7887 uniFE11
7888 uniFE12
8268 uniFE10
8274 uniFF0Ev

kana.map:

mergeFonts KozGoAJ10-ExtraLight-Kana 1
842 uni3041
843 uni3042
844 uni3043
845 uni3044
846 uni3045
847 uni3046
925 uni30A1
926 uni30A2
927 uni30A3
928 uni30A4
929 uni30A5
930 uni30A6
7918 uni3041v
7919 uni3043v
7920 uni3045v
7928 uni30A1v
7929 uni30A3v
7930 uni30A5v

kanji.map:

mergeFonts KozGoAJ10-ExtraLight-Kanji 1
1125 uni4E9C
1126 uni5516
1127 uni5A03
1128 uni963F
1129 uni54C0
1130 uni611B

It is important to note that the argument after the “mergeFonts” text in the first line of each mergeFonts mapping file specifies the name of an FDArray element. Thus, if two different mergeFonts mapping files specify the same argument, the glyphs will share the same FDArray element. Here are the FDArray element names:

KozGoAJ10-ExtraLight-Generic
KozGoAJ10-ExtraLight-Proportional
KozGoAJ10-ExtraLight-Dingbats
KozGoAJ10-ExtraLight-Kana
KozGoAJ10-ExtraLight-Kanji

Step 2: Create the CIDFont Resource

As soon as the mergeFonts mapping files and a “cidfontinfo” file are prepared, the following mergeFonts command line can be executed to produce a CIDFont resource named “cidfont.raw” that has five FDArray elements:

% mergeFonts -cid cidfontinfo cidfont.raw generic.map font.pfa proportional.map font.pfa dingbats.map font.pfa kana.map font.pfa kanji.map font.pfa

The AFDKO tx tool can be used to verify that there are indeed five FDArray elements (shown after “## FontDict[*]” lines), and what their hinting parameters are:

% tx -0 cidfont.raw
## Filename cidfont.1
## Top Dict
Notice "Kozuka Gothic is either a registered trademark or trademark of Adobe Systems Incorporated in the United States and/or other co"
FullName "Kozuka Gothic AJI0 OpenType ExtraLight"
FontBBox {0,-95,964,841}
XUID {1,11,9273858}
cid.CIDFontName "KozGoAJ10-ExtraLight"
cid.Registry "Adobe"
cid.Ordering "Japan1"
cid.Supplement 0
cid.CIDFontVersion 1.000
cid.CIDCount 8275
sup.flags 0x00000001 (ABF_CID_FONT)
sup.srcFontType Type 1 (cid-keyed)
sup.nGlyphs 48
## FontDict[0]
FontName "KozGoAJ10-ExtraLight-Generic"
## Private
BlueValues {-250,-250,1100,1100}
StdHW 50
StdVW 50
LanguageGroup 1
## FontDict[1]
FontName "KozGoAJ10-ExtraLight-Proportional"
## Private
BlueValues {-250,-250,1100,1100}
StdHW 50
StdVW 50
## FontDict[2]
FontName "KozGoAJ10-ExtraLight-Dingbats"
## Private
BlueValues {-250,-250,1100,1100}
StdHW 50
StdVW 50
LanguageGroup 1
## FontDict[3]
FontName "KozGoAJ10-ExtraLight-Kana"
## Private
BlueValues {-250,-250,1100,1100}
StdHW 50
StdVW 50
LanguageGroup 1
## FontDict[4]
FontName "KozGoAJ10-ExtraLight-Kanji"
## Private
BlueValues {-250,-250,1100,1100}
StdHW 50
StdVW 50
LanguageGroup 1

The tx tool can also be used to verify per-CID FDarray element assignment (the “iFD” value) in text form:

% tx -1 cidfont.ps
(removed lines that are the same as when specifying the “-0? option)
## glyph[tag] {cid,iFD,LanguageGroup}
glyph[0] {0,0,1}
glyph[1] {1,1,1}
glyph[2] {34,1,1}
glyph[3] {35,1,1}
glyph[4] {36,1,1}
glyph[5] {37,1,1}
glyph[6] {38,1,1}
glyph[7] {39,1,1}
glyph[8] {66,1,1}
glyph[9] {67,1,1}
glyph[10] {68,1,1}
glyph[11] {69,1,1}
glyph[12] {70,1,1}
glyph[13] {71,1,1}
glyph[14] {633,2,1}
glyph[15] {634,2,1}
glyph[16] {635,2,1}
glyph[17] {636,2,1}
glyph[18] {637,2,1}
glyph[19] {638,2,1}
glyph[20] {842,3,1}
glyph[21] {843,3,1}
glyph[22] {844,3,1}
glyph[23] {845,3,1}
glyph[24] {846,3,1}
glyph[25] {847,3,1}
glyph[26] {925,3,1}
glyph[27] {926,3,1}
glyph[28] {927,3,1}
glyph[29] {928,3,1}
glyph[30] {929,3,1}
glyph[31] {930,3,1}
glyph[32] {1125,4,1}
glyph[33] {1126,4,1}
glyph[34] {1127,4,1}
glyph[35] {1128,4,1}
glyph[36] {1129,4,1}
glyph[37] {1130,4,1}
glyph[38] {7887,2,1}
glyph[39] {7888,2,1}
glyph[40] {7918,3,1}
glyph[41] {7919,3,1}
glyph[42] {7920,3,1}
glyph[43] {7928,3,1}
glyph[44] {7929,3,1}
glyph[45] {7930,3,1}
glyph[46] {8268,2,1}
glyph[47] {8274,2,1}

Step 3: Apply Hinting Parameters

Of course, it doesn’t make much sense for multiple FDArray elements to share the same hinting parameters, so after adjusting the hinting parameters to be appropriate values and running the AFDKO autohint tool to apply them, the tx output is different:

% tx -0 cidfont.ps
tx: --- cidfont.ps
## Filename cidfont.ps
## Top Dict
Notice "Kozuka Gothic is either a registered trademark or trademark of Adobe Systems Incorporated in the United States and/or other co"
FullName "Kozuka Gothic AJI0 OpenType ExtraLight"
FontBBox {0,-95,964,841}
XUID {1,11,9273858}
cid.CIDFontName "KozGoAJ10-ExtraLight"
cid.Registry "Adobe"
cid.Ordering "Japan1"
cid.Supplement 0
cid.CIDFontVersion 1.000
cid.CIDCount 8275
sup.flags 0x00000001 (ABF_CID_FONT)
sup.srcFontType Type 1 (cid-keyed)
sup.nGlyphs 48
## FontDict[0]
FontName "KozGoAJ10-ExtraLight-Generic"
## Private
BlueValues {-250,-250,1100,1100}
StdHW 50
StdVW 50
LanguageGroup 1
## FontDict[1]
FontName "KozGoAJ10-ExtraLight-Proportional"
## Private
BlueValues {-12,0,536,548,756,767}
OtherBlues {-234,-222}
StdHW 31
StdVW 35
## FontDict[2]
FontName "KozGoAJ10-ExtraLight-Dingbats"
## Private
BlueValues {-250,-250,1100,1100}
StdHW 29
StdVW 29
StemSnapH {12,29}
LanguageGroup 1
## FontDict[3]
FontName "KozGoAJ10-ExtraLight-Kana"
## Private
BlueValues {-250,-250,1100,1100}
StdHW 32
StdVW 32
StemSnapH {17,32}
LanguageGroup 1
## FontDict[4]
FontName "KozGoAJ10-ExtraLight-Kanji"
## Private
BlueValues {-250,-250,1100,1100}
StdHW 30
StdVW 30
StemSnapH {12,30}
LanguageGroup 1

Step 4: Build the OpenType Font

This CIDFont resource declares the Adobe-Japan1-0 ROS, meaning that existing Adobe-Japan1-6 resources, such as the “UniJIS-UTF32-H” or “UniJIS2004-UTF32-H” CMap resources for building the ‘cmap’ table, and ‘GSUB’ features, can be leveraged. This simplifies development, because these resources can be used, either as-is (CMap resources) or in modified form (‘GSUB’ features). The “FontMenuNameDB” and “features” files still need to be created. The following AFDKO makeotf command line will produce a fully-functional OpenType font:

% makeotf -f cidfont.ps -r

Please stay tuned for Part 3 in this series…


View the original article here