Showing posts with label Three. Show all posts

Friday, July 12, 2013

Review: Evoland compressed three decades of video game history in a game

Evoland, you play a nameless (until you finally unlock the ability to themselves the name) adventurers, who will move from a rapidly changing world, gut-wrenching monster and looking after chests without purpose (until you the feature "Storyline" unlock). Evoland began as a contest entry for 24-hour video game design and sufficiently well adopted, expanded Shiro games to a commercial product.

Evoland the opening screen. You have learned to move in one direction!

Evoland begins as a four-colour CGA-style 2D Scroller is designed to get color, graphics, and so revolutionary about "save points" and "Not die in one hit." The early upgrades come fast, but as the game progresses, you spend more time in a particular game style between radical changes.

Whether you believe it or not, were children, these graphics really impressive back in the day.

It is an excellent concept and Evoland maintains a gentle humor about some of the clichés and Tropics of the older games without in mockery. Gameplay is smooth and usually quickly: you have navigation keys and a single action button that does each context, different things. There are not many references or help that faithfully the period comprises the period Evoland. As well not know Automapping takes awhile, and more save games a feature.

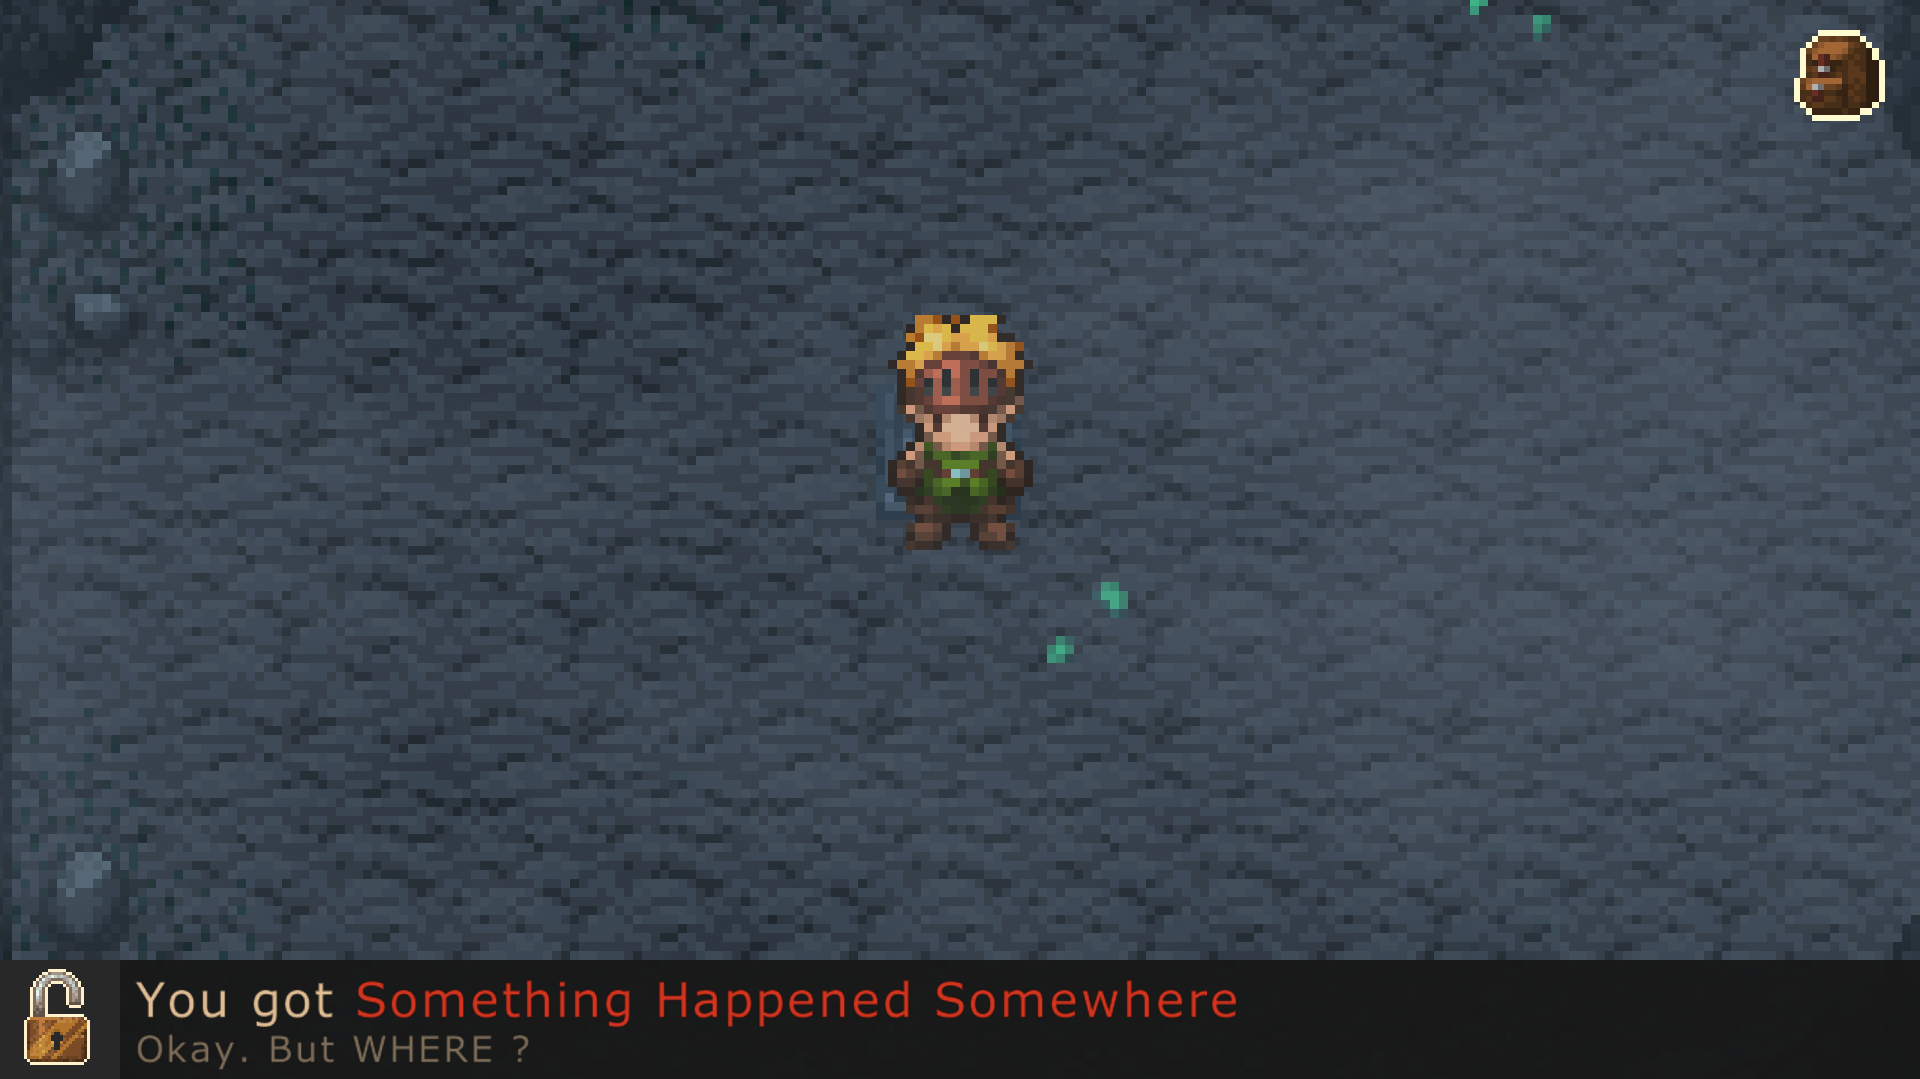
Prepare all over the map to find out, what tromp.

The most important inspiration for Evoland is action RPGs, instead of the turn-based final fantasy style, though some play the game in this manner. Most of the time, you move around freely and breaking up the action button while trying to Dodge fireballs or other obstacles to your existence.

Evoland for players used to this kind of play probably relatively easy. I was never a big fan of timing/reflex based games (wizardry and Ultima were more my speed), occasionally frustrating, something I that might not apply to many players found to some of the areas.

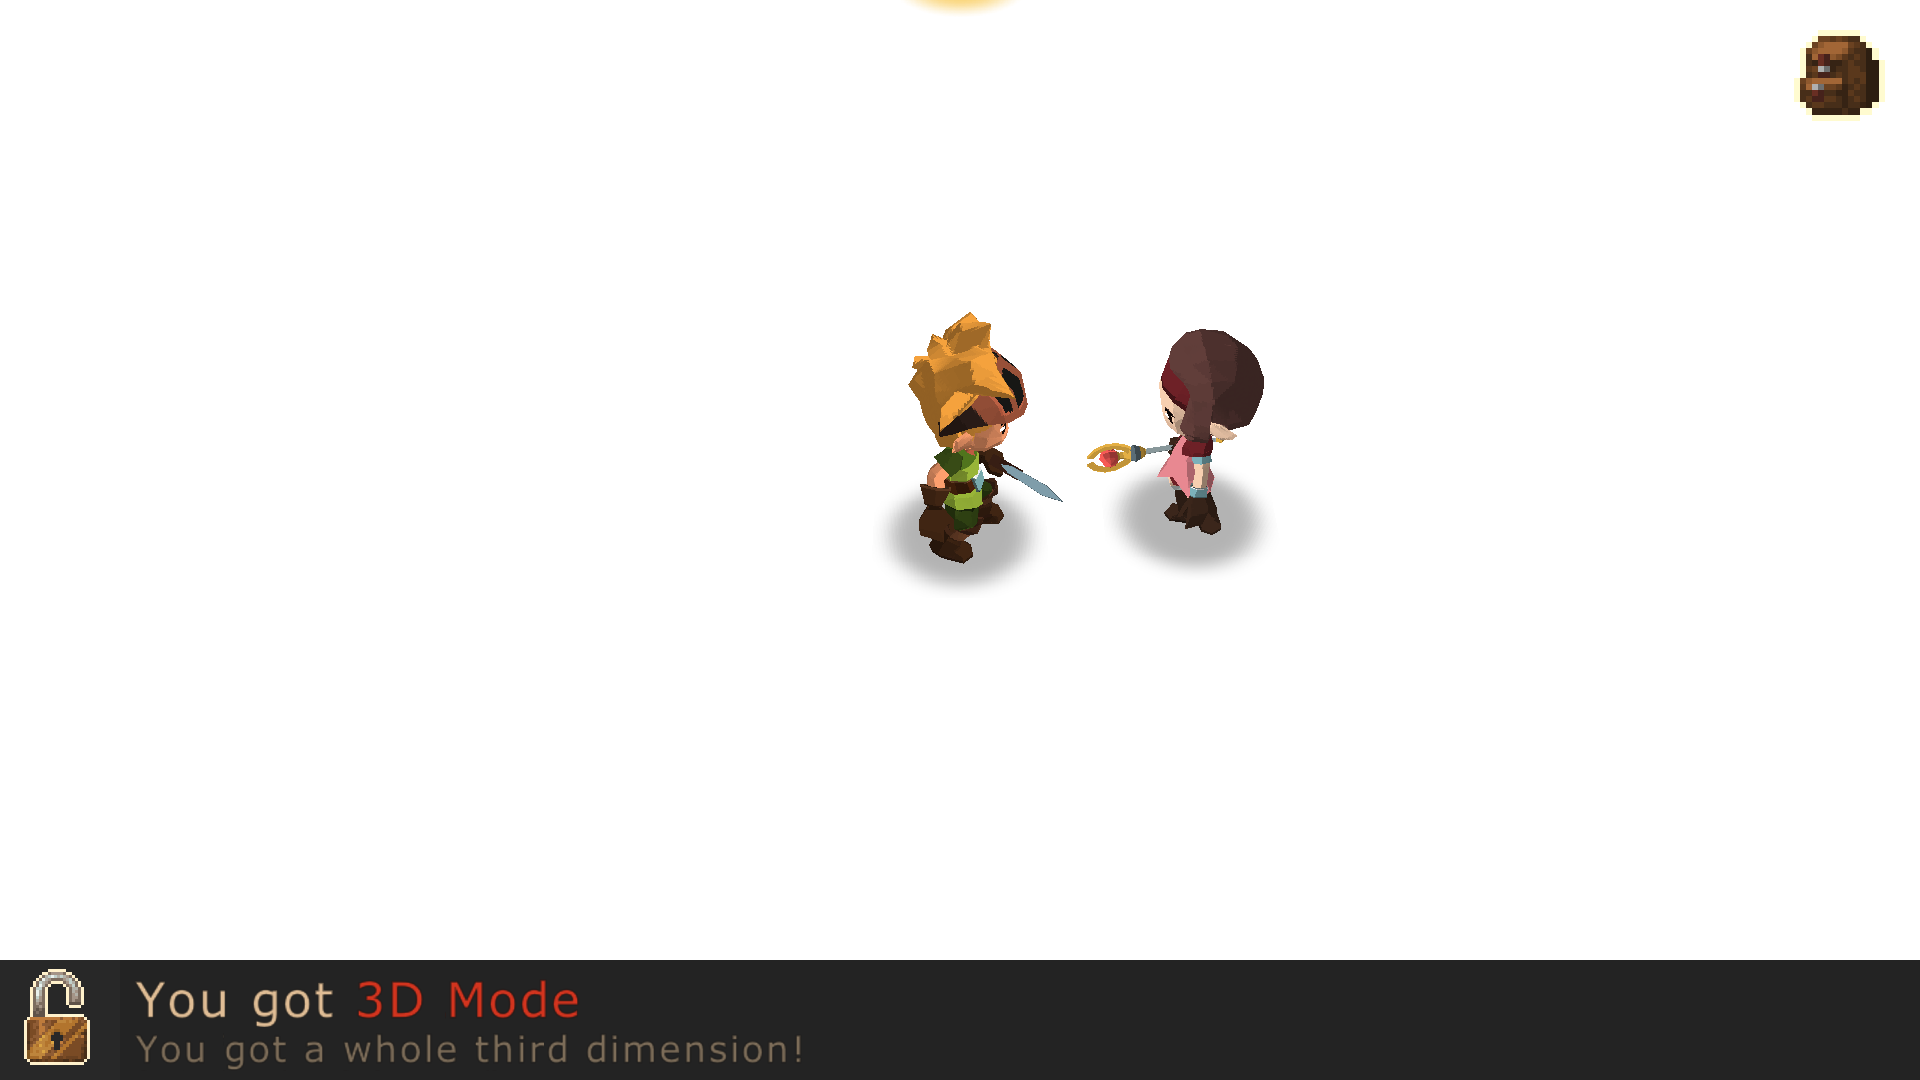
The world is no longer flat.

The only real problem with Evoland is that although evolution and function unlock the concept of the game is great, deep gameplay is pretty slowly added. The first hour of the game, when changing the interface and graphics regularly, offer very few monsters, items, or options. On the other hand could a fast race preferable by legacy systems and styles, for some players, as on a kind of stale long enough and way to play, to remember why many older features have been changed in the first place.

The world is no longer grainy.

Evoland complexity and options to develop, in addition to the graphics, and it is to gain many achievements and find hidden areas. I highly recommend it.

Note: The download button takes you to the manufacturers website where you can download the latest version of the software.


View the original article here

Saturday, April 6, 2013

One OS, three installation options: What's the best way to install Windows 8?

AppId is over the quota

Ahh, Windows 8. If you’ve decided you're ready to plunk down your hard-earned cash to give this modern UI a shot, you'll want to spend a few minutes considering just how you take your first steps into the Windows 8 experience.

You have three ways to install Windows 8 after you’ve purchased it: (a) Run it as a virtual machine on your current operating system; (b) dual-boot it alongside your current operating system; or (c) perform a full install and overwrite the OS you're currently rolling with. While the installation methods vary in complexity, all three are within the grasp of even Windows novices, and each brings its own pros and cons to the table.

Let's take a deeper look at each option.

One of the easiest ways to play with Windows 8 without having it affect your current operating-system setup is to install it in a virtual machine. While you can get fancy and purchase premium VM software like Parallels Workstation for this purpose, a completely free program called VirtualBox accomplishes the same thing, minus a few bells, whistles, and advanced options.

Installing Windows 8 in VirtualBox.

A virtual machine is exactly what its name suggests. VM software allows you to install and run a virtualized operating system within your existing operating system, and everything you do in that Inception-like second operating system is contained within its own individual environment. Once you're done playing around with your virtualized OS, you can eradicate it with just a few clicks of the mouse—the virtualized OS is really nothing more than a series of files on your normal system’s physical hard drive.

We can’t stress this enough: What you do within your virtualized OS has absolutely no bearing on your actual operating system. Delete files. Change settings. Do whatever you want! Once you’re done tinkering around for the day, all you have to do is shut down your virtualized version of Windows 8 to return to your normal operating system's desktop.

The downsides? First, running a virtualized OS requires more configuration steps than installing Windows 8 directly. For example, most VM software requires you to have a processor that supports hardware virtualization to run Windows 8, and you'll have to make sure that virtualization is enabled within your system’s BIOS. A quick and easy way to check all of this is to download Microsoft’s official Hardware-Assisted Virtualization Tool and run it as an administrator on your PC. If you’re ready to virtualize, the tool will let you know.

Second, you'll need to make sure your that PC's core components are up to the task of virtualization. Not only must the machine fulfill the minimum hardware requirements for Windows 8, it must also be able to handle not one but two concurrently active operating systems. That's right: The virtual machine will use the same physical hardware resources as your normal OS, and because both systems will be running simultaneously, we recommend virtualizing Windows 8 on rigs with hefty system specs to ensure that you have enough resources to dedicate to both operating systems. In an ideal world, you'll allocate at least 3GB of RAM to each OS.

Even with a beefy system, running Windows 8 virtually will likely deliver a slightly less than perfect experience on a standard PC, with occasional graphical lags, performance hiccups, and the frustration of having to move a mouse cursor between operating-system environments if you run the VM in a window rather than in full-screen mode. And Windows 8's Internet connection sometimes glitches out momentarily in VirtualBox.

Our advice? Virtualizing Windows 8 is a great way to get a feel for the OS before you’re ready to commit for good, but it’s no replacement for a full-fledged installation.

Dual-booting Windows 8 alongside your current operating system is an easy process—so don’t be scared if you’ve never done it before. We've already published a guide that can walk you through creating a new, Windows 8-ready partition on your hard drive and starting the installation process itself.

Allocating partitions to prepare for a dual boot installation.

Once the secondary operating system is up and running, you’ll be given a "choose-your-own-adventure"-style screen whenever you boot up your PC, asking you whether you’d like to boot into Windows 8 or the other OS stored on your hard drive. If you don’t pick an option, your system will default to Windows 8 after a brief period of time.

The benefits of dual-booting are obvious: You gain access to two operating systems instead of one, and the performance of neither system is impacted by the other, because each is just a simple, separate partition on your hard drive.

The drawbacks? Once you opt to dual-boot, it can be a real hassle if and when you decide to remove Windows 8, and go back to a single-boot system using your older Windows operating system. Spoiler: You’ll have to poke around in Windows’ Boot Configuration Data Store Editor (bcdedit.exe) just to ensure that you have a means for booting back into your legacy OS after you’ve tossed Windows 8.

In other words, don’t just delete the Windows 8 partition!

You’ll also be sacrificing room on your hard drive to run two operating systems that are completely independent from one another. It almost goes without saying, but installing an app like Steam on Windows 7 doesn’t mean that you’ll be able to run it through Windows 8—they're two separate worlds. You’d have to install Steam on Windows 8 as well, duplicating your efforts on a single drive.

All that said, dual-booting is a tried-and-true process for making the most out of two different operating systems if you absolutely can’t live without each. We recommend the process wholeheartedly unless space is of the utmost concern on your system. And if that’s the case, maybe it’s time for a second hard drive.

Here we go. The biggie. You’re ready to take the full plunge and wave goodbye to your legacy operating system forever. Windows 8 has arrived, and it is the conqueror on your desktop. Let no other operating system stand in its path.

Installing Windows 8 is extraordinarily easy and extraordinarily quick. First, though, pay heed to the gentle but firm notice that you get only one shot at this if you’re doing a clean install. Make sure that you’ve backed up all important files from your existing operating system before you wipe it and start anew.

Upgrade or fresh install? Choose wisely, young Padawan.

You'll also need to decide whether you’re going to upgrade from your existing operating system or go with a completely clean installation. In short, an upgrade installation will do its best to preserve your files and settings from one operating system to the next. Just how much of your existing OS experience is preserved depends on what you’re running: When upgrading from Windows 7, Windows 8 will attempt to preserve all your personal files as well as your applications. But if you're upgrading from Vista or XP, Windows 8 will preserve only the files, and you'll have to reinstall your apps afterwards.

The other option is to perform a clean installation, which completely wipes your existing OS and all the files on your hard drive partition, then follows up with a fresh, brand-new installation of Windows 8. Scorched earth.

So which do you pick? The jury is out. More experienced computer users who really enjoy the clean slate of a wipe-and-install—or who are otherwise terrified that they aren’t going to get peak performance from whatever drivers Windows 8 keeps around from Windows 7—should opt for the clean installation. A clean install is also a great way to give your PC a "do-over" to clean out the clutter that accumulates over the years. Indeed, on the second go-around of app installations, you might be less likely to install programs you don’t actually use much.

Otherwise, Microsoft has improved the upgrade process so that it’s not all that scary transferring information over to a new Windows (Windows 8) installation. You’ll still want to go into the nooks and crannies of Windows 8 itself to ensure that all of your major settings have transitioned over. We also recommend that you go straight to the manufacturers’ sites for new drivers for your various system components—video card, sound card, motherboard, and so on.

And, once again, please save your settings before you upgrade. For example, while your preferred Internet browser might make the journey to Windows 8, the operating system might not keep your bookmarks.

I love installing apps, so I love the thrill that a fresh install brings to the table. That being said, we have no official recommendation for which Windows installation process—clean or upgrade—would best work for you. There definitely are trade-offs in either scenario. Now that you know what's on the table, the choice is yours.

You'll be staring at this screen no matter which method you choose!

And there you have it! If you’re most concerned with having an easy exit and don’t mind trading a bit of performance in the process, then virtualizing Windows 8 is a great way to get familiar with the OS—and tweak it in all sorts of crazy ways—without doing any damage to your existing OS. Dual-booting Windows 8 is a compelling option for mixing the old and the new; you’ll just give up a bit of space to do so. And going the distance with Windows 8 will give you the option to upgrade or start from scratch.

No matter which method you choose, you may want to check out our guide to optimizing your first 30 minutes with Windows 8 to ensure you make the most of your new OS.


View the original article here

Thursday, February 21, 2013

One OS, three installation options: What's the best way to install Windows 8?

AppId is over the quota

Ahh, Windows 8. If you’ve decided you're ready to plunk down your hard-earned cash to give this modern UI a shot, you'll want to spend a few minutes considering just how you take your first steps into the Windows 8 experience.

You have three ways to install Windows 8 after you’ve purchased it: (a) Run it as a virtual machine on your current operating system; (b) dual-boot it alongside your current operating system; or (c) perform a full install and overwrite the OS you're currently rolling with. While the installation methods vary in complexity, all three are within the grasp of even Windows novices, and each brings its own pros and cons to the table.

Let's take a deeper look at each option.

One of the easiest ways to play with Windows 8 without having it affect your current operating-system setup is to install it in a virtual machine. While you can get fancy and purchase premium VM software like Parallels Workstation for this purpose, a completely free program called VirtualBox accomplishes the same thing, minus a few bells, whistles, and advanced options.

Installing Windows 8 in VirtualBox.

A virtual machine is exactly what its name suggests. VM software allows you to install and run a virtualized operating system within your existing operating system, and everything you do in that Inception-like second operating system is contained within its own individual environment. Once you're done playing around with your virtualized OS, you can eradicate it with just a few clicks of the mouse—the virtualized OS is really nothing more than a series of files on your normal system’s physical hard drive.

We can’t stress this enough: What you do within your virtualized OS has absolutely no bearing on your actual operating system. Delete files. Change settings. Do whatever you want! Once you’re done tinkering around for the day, all you have to do is shut down your virtualized version of Windows 8 to return to your normal operating system's desktop.

The downsides? First, running a virtualized OS requires more configuration steps than installing Windows 8 directly. For example, most VM software requires you to have a processor that supports hardware virtualization to run Windows 8, and you'll have to make sure that virtualization is enabled within your system’s BIOS. A quick and easy way to check all of this is to download Microsoft’s official Hardware-Assisted Virtualization Tool and run it as an administrator on your PC. If you’re ready to virtualize, the tool will let you know.

Second, you'll need to make sure your that PC's core components are up to the task of virtualization. Not only must the machine fulfill the minimum hardware requirements for Windows 8, it must also be able to handle not one but two concurrently active operating systems. That's right: The virtual machine will use the same physical hardware resources as your normal OS, and because both systems will be running simultaneously, we recommend virtualizing Windows 8 on rigs with hefty system specs to ensure that you have enough resources to dedicate to both operating systems. In an ideal world, you'll allocate at least 3GB of RAM to each OS.

Even with a beefy system, running Windows 8 virtually will likely deliver a slightly less than perfect experience on a standard PC, with occasional graphical lags, performance hiccups, and the frustration of having to move a mouse cursor between operating-system environments if you run the VM in a window rather than in full-screen mode. And Windows 8's Internet connection sometimes glitches out momentarily in VirtualBox.

Our advice? Virtualizing Windows 8 is a great way to get a feel for the OS before you’re ready to commit for good, but it’s no replacement for a full-fledged installation.

Dual-booting Windows 8 alongside your current operating system is an easy process—so don’t be scared if you’ve never done it before. We've already published a guide that can walk you through creating a new, Windows 8-ready partition on your hard drive and starting the installation process itself.

Allocating partitions to prepare for a dual boot installation.

Once the secondary operating system is up and running, you’ll be given a "choose-your-own-adventure"-style screen whenever you boot up your PC, asking you whether you’d like to boot into Windows 8 or the other OS stored on your hard drive. If you don’t pick an option, your system will default to Windows 8 after a brief period of time.

The benefits of dual-booting are obvious: You gain access to two operating systems instead of one, and the performance of neither system is impacted by the other, because each is just a simple, separate partition on your hard drive.

The drawbacks? Once you opt to dual-boot, it can be a real hassle if and when you decide to remove Windows 8, and go back to a single-boot system using your older Windows operating system. Spoiler: You’ll have to poke around in Windows’ Boot Configuration Data Store Editor (bcdedit.exe) just to ensure that you have a means for booting back into your legacy OS after you’ve tossed Windows 8.

In other words, don’t just delete the Windows 8 partition!

You’ll also be sacrificing room on your hard drive to run two operating systems that are completely independent from one another. It almost goes without saying, but installing an app like Steam on Windows 7 doesn’t mean that you’ll be able to run it through Windows 8—they're two separate worlds. You’d have to install Steam on Windows 8 as well, duplicating your efforts on a single drive.

All that said, dual-booting is a tried-and-true process for making the most out of two different operating systems if you absolutely can’t live without each. We recommend the process wholeheartedly unless space is of the utmost concern on your system. And if that’s the case, maybe it’s time for a second hard drive.

Here we go. The biggie. You’re ready to take the full plunge and wave goodbye to your legacy operating system forever. Windows 8 has arrived, and it is the conqueror on your desktop. Let no other operating system stand in its path.

Installing Windows 8 is extraordinarily easy and extraordinarily quick. First, though, pay heed to the gentle but firm notice that you get only one shot at this if you’re doing a clean install. Make sure that you’ve backed up all important files from your existing operating system before you wipe it and start anew.

Upgrade or fresh install? Choose wisely, young Padawan.

You'll also need to decide whether you’re going to upgrade from your existing operating system or go with a completely clean installation. In short, an upgrade installation will do its best to preserve your files and settings from one operating system to the next. Just how much of your existing OS experience is preserved depends on what you’re running: When upgrading from Windows 7, Windows 8 will attempt to preserve all your personal files as well as your applications. But if you're upgrading from Vista or XP, Windows 8 will preserve only the files, and you'll have to reinstall your apps afterwards.

The other option is to perform a clean installation, which completely wipes your existing OS and all the files on your hard drive partition, then follows up with a fresh, brand-new installation of Windows 8. Scorched earth.

So which do you pick? The jury is out. More experienced computer users who really enjoy the clean slate of a wipe-and-install—or who are otherwise terrified that they aren’t going to get peak performance from whatever drivers Windows 8 keeps around from Windows 7—should opt for the clean installation. A clean install is also a great way to give your PC a "do-over" to clean out the clutter that accumulates over the years. Indeed, on the second go-around of app installations, you might be less likely to install programs you don’t actually use much.

Otherwise, Microsoft has improved the upgrade process so that it’s not all that scary transferring information over to a new Windows (Windows 8) installation. You’ll still want to go into the nooks and crannies of Windows 8 itself to ensure that all of your major settings have transitioned over. We also recommend that you go straight to the manufacturers’ sites for new drivers for your various system components—video card, sound card, motherboard, and so on.

And, once again, please save your settings before you upgrade. For example, while your preferred Internet browser might make the journey to Windows 8, the operating system might not keep your bookmarks.

I love installing apps, so I love the thrill that a fresh install brings to the table. That being said, we have no official recommendation for which Windows installation process—clean or upgrade—would best work for you. There definitely are trade-offs in either scenario. Now that you know what's on the table, the choice is yours.

You'll be staring at this screen no matter which method you choose!

And there you have it! If you’re most concerned with having an easy exit and don’t mind trading a bit of performance in the process, then virtualizing Windows 8 is a great way to get familiar with the OS—and tweak it in all sorts of crazy ways—without doing any damage to your existing OS. Dual-booting Windows 8 is a compelling option for mixing the old and the new; you’ll just give up a bit of space to do so. And going the distance with Windows 8 will give you the option to upgrade or start from scratch.

No matter which method you choose, you may want to check out our guide to optimizing your first 30 minutes with Windows 8 to ensure you make the most of your new OS.


View the original article here

Sunday, September 16, 2012

Three ways to make your picture fit your slide

AppId is over the quota

(This post was first published in March 2011.  We're Today's post on fitting pictures into PowerPoint is part of a series by Bruce Gabrielle, author of Speaking PowerPoint: The New Language of Business, a 12-step process for creating clearer and more convincing PowerPoint presentations for the boardroom. You can also check out his series of quick video tips for business managers using PowerPoint. Note: This post was first published in 2011)

Ever have this problem? You have a great picture for your PowerPoint slide, but it fits awkwardly on the page, leaving a big gap of white space. This looks really amateurish.

Bald eagle example slide

What do you do? Here are three graphic design tips to make this slide look more professional. 

Use a background color from the picture. Using Color Cop, sample a color from the picture and use that color to fill the side box. Now this slide looks like it was "designed" rather than thrown together.
2 slides with background color addedMake the picture smaller. Crop and resize the picture, and then put a wide border around it and tilt it to look like a Polaroid photograph. Add a drop shadow behind it. Use one of the colors from the photograph as your slide background color.

2 slides with photo resized and tilted

Make the picture bigger. Increase the picture size and crop it so it fills the entire PowerPoint slide. Make sure the text fits the contours of the picture. In this example, the text is ragged on the left so it curves around the eagle's head (left). Justified left creates an invisible border that cuts this picture in half (right).

2 slides with photo enlarged to fill slide

Amateurish slides dent your credibility. Spend the extra time with your pictures so they look designed into the slide, and not just slapped awkwardly into place.

-- Bruce Gabrielle


View the original article here

Saturday, September 15, 2012

Can’t find that email message? These three tips can help.

AppId is over the quota

(This post was first published in 2010.  It's obvious from the number of hits this page gets that people's inboxes are still overflowing. We thought we'd share it again to help you out.)

Hi, I am Roby Kurian, Product Manager for Outlook. How often do you ask yourself, “Where’s that message?”

Whether you are a filer (you keep messages carefully organized in folders) or a piler (you keep all of your messages in your Inbox), these three tips can help you find that elusive message.

Personally, I am more of a piler — I have created folders and use Outlook rules to direct some messages automatically to those folders. But most of my work messages stay in my Inbox. Leave a comment below and let us know if you are a filer or piler.

Now let’s talk about the main topic of this blog — search. We made great improvements to search performance in Outlook 2010. Here are three scenarios and strategies to find the email you are searching for.

Instant Search is always a great place to start. If you’re looking for a message from Dan Wilson about some TPS Reports, just type “Dan Wilson TPS Reports” into the Instant Search box. The message from Dan appears.

clip_image002

Sometimes, there might be too many results matching your Instant Search criteria. For example, you’re looking for a message from your manager, and you have 200 messages from him or her in your Inbox (or 2000, if you’re a piler like me and your manager sends as many messages as mine does). In this case, the Search Tools ribbon comes to the rescue. As soon as you click in the Instant Search box, the Search Tools ribbon automatically appears.

clip_image004

Fine tune the search with any additional information you have about the message you’re looking for. If you know part of the subject, click Subject, and type the subject. If you know the message had an attachment, click Has Attachments. There are many ways to refine your search by clicking More in the Refine group.

If you are a filer and can’t remember which folder a message is in, don’t forget to select a folder scope in the Scope group on the ribbon. Click All Outlook Items to expand your search to more mail folders or to include all folders including your calendar, contacts, and tasks.

clip_image006

If you find yourself repeating the same search over and over, you might want to create a Search Folder. A Search Folder is a virtual folder that provides a view of all email items that match specific search criteria. For example, if you regularly search for emails that are more than 1 MB, you can create a Search Folder. Then, the next time you want to find those large messages, just open the Search Folder you created. It’s always up-to-date with the items that match that Search Folder’s criteria.

clip_image007

You can learn more about Search Folders at Office.com.

If you’re using Outlook 2010, leave a comment about your experience with search compared to previous versions of Outlook.

Roby Kurian
Senior Product Manager, Microsoft Outlook


View the original article here

Tuesday, March 13, 2012

Three Power Tips for Reading the Office Blog

AppId is over the quota

This post is written by Craig Kerwien, the Director of Site Management in the Office Division Product Management Group.

Girl reading the Office Blog app on a Windows PhoneWe're all about productivity and getting things done here in the back offices of the Office Blog command center. We've made a few changes to the blog in the past several months that make it super easy to read  and keep up with our latest posts. All you need to know are these three power tips.

Tip# 1:  Use all of Outlook's nifty RSS features

Do you use an RSS reader? Chances are good you already have one - Outlook comes with most editions of Office today (except for Home & Student), and it has a few cool reading features built in:

Share how to add the main feedMove feed shortcut up to favoritesTeach how to find the other RSS feeds so people can plug in or use another reader.Provide feed list

Tip# 2:  Read the Office Blog on your Windows Phone                    

Have a Windows Phone? We just released a quick simple app that you lets scan the latest blog headlines, click a post, and read it on your phone. If you don't have a Windows Phone, then you can just use your favorite RSS reader on your mobile device and plug in any of the RSS feeds shared above.

Creating a Windows Phone App for the blog was a fun little side project for us. We used a simple Windows Phone app toolkit from Microsoft Evangelist Chris Koenig and created it in a weekend. If you'd like to learn more about how we created the app, check out this behind-the-scenes post.

Tip# 3:  Pin Office Blog to your task bar

Do you use IE9 and Windows 7? Then you can pin the Office Blogs to your task bar for an easy way to scan the latest posts or go directly to the Office Blog or Office app home pages. 

-- Craig Kerwien


View the original article here