AppId is over the quota
 BoxCryptor One thing that stops a lot of people from using cloud storage companies is the perceived lack of security. BoxCryptor's encryption helps fill that need.Download Now
 If you want something done right, do it yourself. That may sound trite, but it rings true as advice for securing files that you've stored online. Several recent incidents—including breaches of Dropbox and iCloud—underscore the fact that, even with built-in encryption and SSL transfers, cloud storage providers can't perfectly ensure the safety of your data.
Luckily, you can take cloud security into your own hands.
A few different tools can help safeguard the privacy of your data when you store it on a remote server. One of our favorites is BoxCryptor, an easy-to-use encryption program that works with all of the most popular cloud services, is free to use (though you can pay for upgrades), and helps keep your data safe.
BoxCryptor is basically a virtual hard disk that encrypts files on the fly using 256-bit AES encryption. Unlike TrueCrypt, another popular on-the-fly encryption tool, BoxCryptor encrypts individual files, not an entire volume or container. Consequently, your BoxCryptor-encrypted files sync with your cloud storage service immediately after you save them, whereas TrueCrypt syncing occurs only after you finish encrypting an entire volume.
BoxCryptor encrypts and decrypts your files locally, and it doesn't transmit your password to third parties. As a result, your files remain unreadable to outsiders even if hackers manage to steal your password or otherwise breach your cloud storage provider's defenses.
Setting up BoxCryptor is fairly painless, but the service has a few subtleties that could throw you for a loop. I'll get into those after discussing the differences between the various BoxCryptor offerings and outlining how to get the encryption software up and running.
BoxCryptor is available in three editions: a free version, a $40 Unlimited Personal version, and a $100 Unlimited Business version. Free Android and iPhone apps are also available.
 It's hard to argue with free.
 The free version, which should suffice for many people, permits you to operate a single virtual hard disk for encrypting and decrypting files. Upgrading to the Unlimited Personal version introduces multiple virtual drives, so you can access several encrypted folders simultaneously; it also lets you encrypt file names, not just file contents. The Business license is the same as the Unlimited Personal license, but it includes a legal clause that allows you to use it in the workplace.
The first step in setting up BoxCryptor is to figure out how to download the right program from the BoxCryptor website. The row of gray icons at the top of the download page looks like a simple informative image, but you must click the icon of your operating system to snag the installation file.
 Passwords: You just can't live without 'em.
 Once you have it, double-click the file to start the installation wizard, and then choose Create a new BoxCryptor folder. The next screen will ask you to choose a location for the encrypted folder. You can choose an offline local folder as the destination if you like; but BoxCryptor's big draw is that it works with any cloud storage service that creates a local directory on your PC, including the desktop clients for Dropbox, Google Drive, SkyDrive, and Sugar Sync. Most cloud storage services create a local directory in C:/Users/*UserName by default. After you choose the destination folder, enter a name for the BoxCryptor folder that you're creating.
Next, you'll need to choose a drive letter designation for the virtual disk. Be sure to pick one that you aren't already using. (I chose S: for SkyDrive.) Finally, create a password, and you're good to go. I strongly recommend creating a backup of your BoxCryptor configuration file when prompted to do so, since you'll lose the ability to descramble your data if you accidentally delete the config file and don't have a spare copy handy.
To complete the installation process, reboot your PC after closing the wizard. The virtual drive will appear alongside your physical drives when the computer restarts.
If you simply drag files into the BoxCryptor.bc folder that the software creates in your cloud storage directory, the files won't be encrypted. Instead, deposit your files in BoxCryptor's virtual drive (S:, in my case). Doing so will also make them appear in your cloud storage folder in encrypted form.
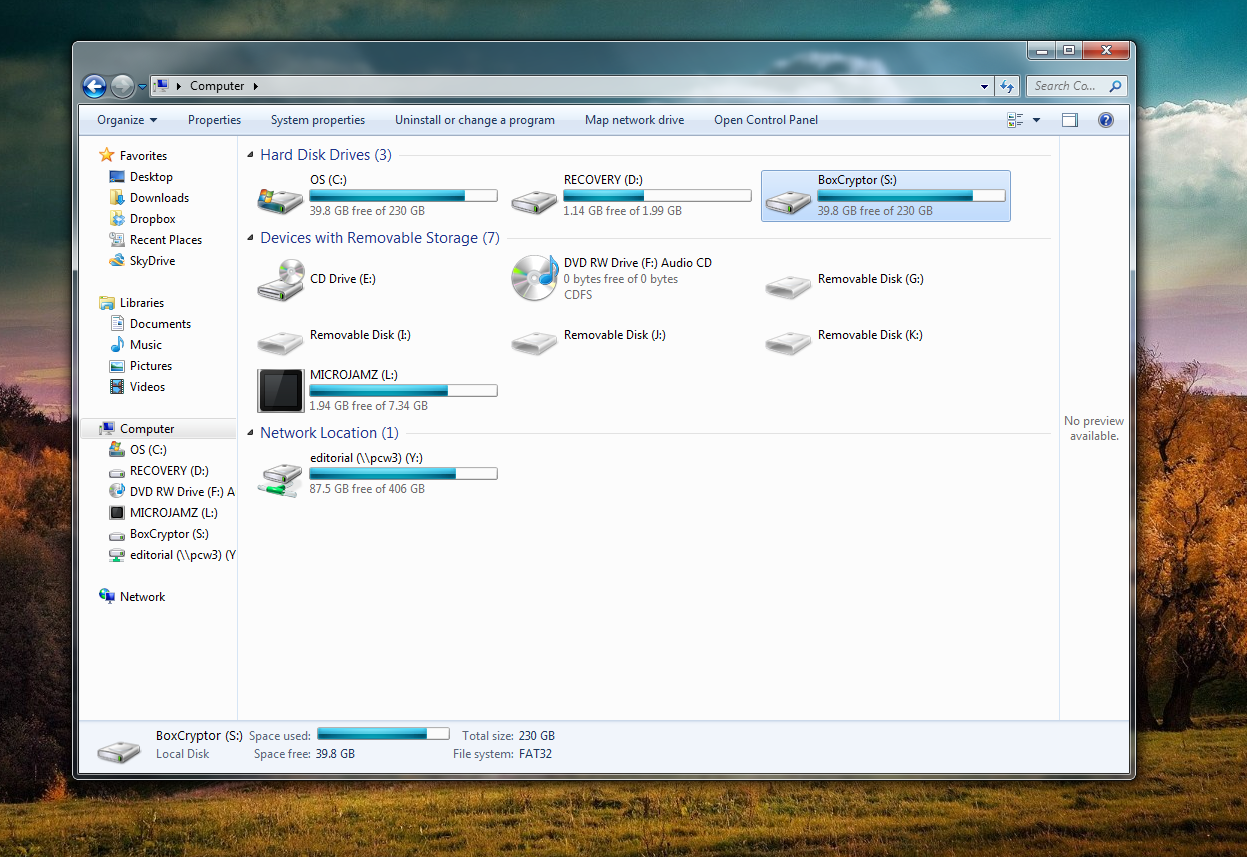 BoxCryptor creates a virtual drive that resides alongside your physical drives.
 Similarly, the only way to unencrypt your files is to withdraw them via the same virtual drive. If you try to snag your files directly through the BoxCryptor.bc folder they'll remain encrypted, and you won't be able to read them.
This arrangement makes accessing your files on the road a bit of a hassle, but even the free version of BoxCryptor allows you to reach cloud-stored encrypted folders, assuming that you have both BoxCryptor and your cloud service's desktop client installed on your PC. BoxCryptor also offers an Android app for accessing encrypted SkyDrive, Google Drive, and Dropbox files after you enter your BoxCryptor password. An iOS app is available as well, but it works only with Dropbox.
Since both the encrypting and the decrypting occur on BoxCryptor's virtual drive, you'll likely have no reason to wander into the BoxCryptor.bc folder stored in your cloud drive. If you do, however, be careful not to move or delete the encfs6.xml file. That file holds the configuration key for decrypting your files. If you move or delete it, you won't be able to decrypt your files.
Anyone who purchases BoxCryptor Unlimited can run multiple BoxCryptor virtual drives simultaneously, whereas users of the free version are limited to a single virtual drive. Does that mean you can encrypt or decrypt files at only one cloud storage service or offline location? Not at all. It just means that you can have only one virtual drive operating at a given time. Though you can create several encrypted folders, you can encrypt or decrypt files for only one of them at a time.
To create another encrypted folder in a second location, right-click the BoxCryptor icon in your system tray and select Preferences. Next, enter Advanced Mode—ignoring the warning that the program displays—and click the icon for your encrypted virtual disk. The Remove option will turn red and become active; click it. Poof! Your drive will disappear from the list. Don't worry, the actual files (and their encryption key) won't be deleted.
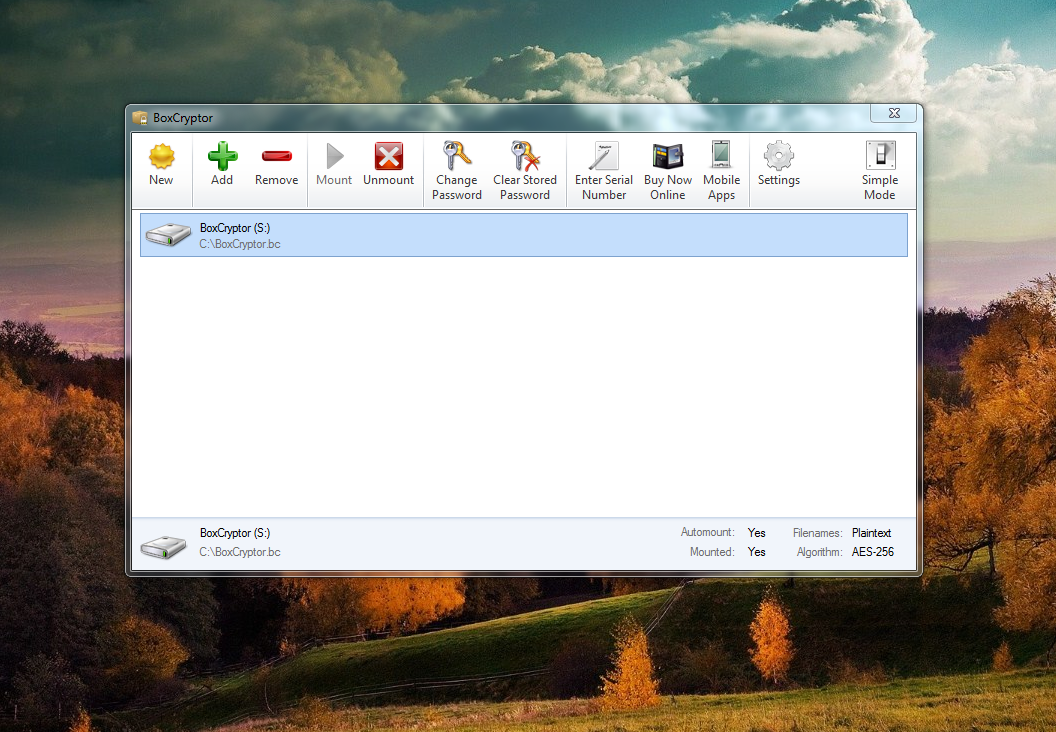 You can use the Advanced mode to add and remove BoxCryptor virtual drives, allowing you to juggle encrypted folders on multiple cloud services at once.
 Now, click the New icon. The installation wizard will pop back up. This time, create another encrypted folder for a different cloud service or offline folder than you did originally. For example, I created an encrypted folder in my Dropbox account to complement the BoxCryptor folder I'd already created in my SkyDrive account. Complete the creation process as you did before, by creating a password and selecting a virtual drive designation. Advanced options will pop up during the process, but you needn't worry about those unless you're curious about the software's niche uses. Bonus: You don't have to reboot the second (or later) time you create a BoxCryptor folder.
When you're done, a BoxCryptor.bc folder will appear in the new location, and a BoxCryptor virtual drive will appear on your computer, just as before. Use this second encrypted folder just as you did your first one, adding and removing files via the virtual drive, not via the BoxCryptor.bc folder itself.
What if you need to access or add a file in the encrypted folder you created the first time around? That virtual drive—though not the folder itself—disappeared when you removed it from the BoxCryptor list to create your second encrypted folder. But reconnecting to your previously created BoxCryptor folders is easy.
First, remove your current virtual drive in the Advanced Mode, as you did before—only this time click Add instead of 'New' when you're done. When the program asks you to choose the location of a BoxCryptor folder, select your originally created BoxCryptor.bc destination. (That's the one in SkyDrive, in my case.) Next, choose a letter for the virtual drive you're creating, ignore the advanced options, and enter your password for the encrypted folder when prompted. Immediately, a virtual drive connected to your original BoxCryptor folder appears on your computer, allowing you to encrypt and decrypt your files to your heart's content.
Deselecting and reactivating virtual drives in order to jump between multiple encrypted folders will get the job done, but repeatedly running through the reactivation process gets very tedious if you bounce between different services frequently. If you want to maintain several encrypted folders and you plan to use them often, I highly recommend upgrading to the $40 Unlimited Personal license—both to reduce activation headaches and to support the developers of this excellent piece of software.
No comments:
Post a Comment